Crochet, knitting, astronomy & life in general.

Showing posts with label food. Show all posts

Monday, November 4, 2013

Quinoa Salad with Cranberries and Red Pepper

Here's another recipe from the fitness blog.


Quinoa is awesome. It's full of fibre and protein and it's absolutely delicious. Bonus: it's also easier to cook than brown rice. A friend of mine turned me back on to quinoa recently. I'd had it before as a kid, but I hadn't eaten it since I moved away from home, mostly because I hadn't realized how easy it was to make. So I've been making all kinds of quinoa salads lately.

I used this this recipe as a jumping off point, and it is by far my favourite quinoa dish so far. It's kind of like a pilaf, I guess. I changed the original recipe enough that I think it merits a retyping here (keep in mind a lot of it is copied and pasted from the original).

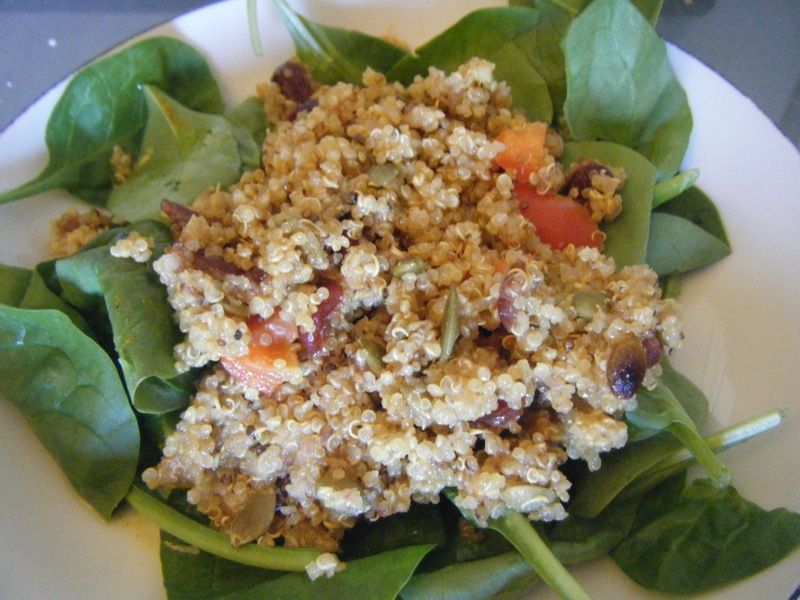
Ingredients (main salad):
  • 1 c. dry quinoa
  • 2 tsp extra virgin olive oil
  • 2 cloves of garlic, minced
  • 1/2 c. dried cranberries
  • 2 cups water
  • 1/4 tsp salt
  • 1/4 red pepper, chopped
  • 4 c. baby spinach
  • 1/2 c. pumpkin seeds, toasted

Ingredients (dressing):
(NOTE: This wasn't actually included in the original recipe, but some kind soul put it in the comments. It turned out that I didn't have any yogurt or any of the spices at the time, so I made do with what was in the pantry. Experimentation is fun!)
  • 1/4 c. lemon juice
  • 1 1/2 tsp honey
  • 1/4 tsp turmeric
  • 1/4 tsp allspice
  • 1/4 tsp dried onion
  • 1/4 c. olive oil
  • 1/4 tsp salt
  • 1/4 tsp freshly ground pepper

Instructions:

1. Toast quinoa in a dry skillet over medium heat, stirring often, until it becomes aromatic and begins to crackle, about 5 minutes. Transfer to a fine sieve and rinse thoroughly.
2. Heat oil in a medium saucepan over medium heat. Add garlic and cook, stirring constantly, until golden, about 1 minute. Add cranberries and the quinoa; continue cooking, stirring often, until the quinoa has dried out and turned light golden, 3 to 4 minutes. Add water and salt; bring to a boil. Reduce heat to medium-low and simmer, uncovered, until the quinoa is tender and the liquid is absorbed, 15 to 18 minutes.
3. Meanwhile, toast the pumpkin seeds in a dry skillet at medium heat, stirring often, for 2 to 3 minutes. Put them in a bowl to cool.
4. Also meanwhile, make dressing by mixing all the dressing ingredients together in a small bowl. Transfer the quinoa to a medium bowl and toss with half the dressing. Add in the pepper and pumpkin seeds. Let cool for 10 minutes.
5. Just before serving, toss spinach with the remaining 1/3 cup dressing in a large bowl. Divide the spinach among 4 plates. Mound the quinoa salad on the spinach and eat!

This makes 4 servings. Per serving, there are 383 calories, 47 g of carbs, 19 g of fat, 8 g of protein, and 5 g of fibre.

Thursday, October 24, 2013

Yummy Tuna Patties

This is a recipe I originally posted in my fitness blog several months ago, but since not many people have access to it, I thought I'd republish it here! As some of you may know, I've been on a real health kick of late. I've lost about 50 lb in about a year and a half (most of which I had gained during grad school), I've started running long distances (I'm doing a 10k race this Sunday!), and in general I've been trying to improve my diet. Part of this has been to drastically increase the amount of protein I've been eating since I'm a real carb addict.


I find that the easiest way to get enough protein in my diet (not that I really get enough protein) is to have a can of tuna once in a while. I have been known to eat it straight out of the can when I'm feeling particularly lazy, but let's face it: tuna on its own is pretty damn boring. For a while I was mixing it with low fat greek yogurt (instead of mayonnaise), a few nuts, maybe some herbs or cut up veggies. I haven't bought greek yogurt in a while, however, so today I decided to mix it up with some stuff I had lying around the kitchen. Thus were born these super tasty tuna patties.

Ingredients
  • 1 can tuna (I used Gold Seal Chunk Light Tuna in broth)
  • 1 egg
  • 2 tbsp instant oats
  • 2 tbsp whole spelt flour
  • 1 tsp whole grain mustard
  • 2 tbsp fresh cilantro
  • small amount of fat for frying pan (I used a bit of non-stick cooking spray)

Mix everything in a bowl with a fork until it's well-blended. Heat up a frying pan to medium heat and add a small amount of fat for cooking (a couple of sprays of non-stick cooking spray in my case). Form the tuna mixture into patties with your hands and gently place them in the frying pan. I was able to make three approximately 3-inch patties. Cook for 5 minutes on each side. Serve immediately.

I've been told they keep, though I can't attest to that because I just wolf mine down right away. I topped them with a few tablespoons of cottage cheese, but low fat greek yogurt is also nice as would be a multitude of other toppings, I'm sure. Here's the nutritional breakdown for all three patties:

Calories: 277kcal
Carbs: 15g
Fat: 9g
Protein: 36g

Enjoy!

Friday, April 6, 2012

The Ultimate Pie

Wow... A whole month without posting! I'm sorry, internet. I'll try to do better next time. How about I make it up to you with pie?

As I have for the last few years, I hosted a Pi Day party at my apartment on March 14th. We never got around to reciting the digits of Pi or playing Pi trivia (much to the boyfriend's relief), but much fun was had by all. We had quite a spread!


In the front is Joanna's vegetable curry pie, which was the boyfriend's pick as the winner of the Pi Day best pie contest, mainly because she made her own crust (and because it was delicious), behind that, we have Steph's chocolate chip cookie pie, then Lisa's coconut creme brule (frickin' amazing), and finally, my Pie Pie. The empty pie pan used to contain a bacon-brocolli-spinache quiche made by the boyfriend, which was instantly devoured. Classes at a pastry school are sounding pretty yummy right now.

I'd like to talk a little about the pie I made... The Pie Pie. I first saw this recipe on The Anticraft years and years ago, and I knew that one day, I would have to make it. The description blew me away (really, it sounds orgasm-inducing), and caramel, peanut butter and chocolate are some of my favourite flavours. At 448 calories per 1/8th of a pie (yes, I calculated it), it's definitely not for the health-concious, but really, it's so delicious that you really shouldn't care.


I decorated mine with the Pi symbol, of course. One pie got devoured at the Pi Day party and the other, we saved for a dinner party later in the month (really a get drunk and do your taxes party). Our hosts made all sorts of noises of appreciation, and I had to stop myself from eating a second piece (because of the afore-mentioned calorie content). This pie took a good five hours to make, so I'm probably not going to make it again any time soon. If I do, I'll try to make my own cookie crumb crusts, I think.

Anyway, the final verdict is, if you have a few hours to kill and an incredible craving for peanut butter caramel goodness (and aren't on a diet), then you should definitely make this pie. I'm seriously drooling just thinking about it right now...

Monday, January 16, 2012

Flavour Zen Tastes

The boyfriend has started a new blog! He's calling it Flavour Zen Tastes, and he's using it to write about his explorations in food. He recently acquired the taste for coffee and has been experimenting with adding interesting flavours to this drink with a local coffee shop owner Brian. He's also been writing about the delicious food we get to eat on a regular basis (yes, this is why I'm getting fat), such as this mouth-watering mustard-crusted trout:


You should go check it out!

Sunday, September 11, 2011

Fun things from the INTERNET!

I love cake, and I love crafts, and when the two come together in a perfect sugary package, well, I just can't resist sharing the awesomeness with the rest of the world. If someone gave me this cake for my birthday, I think I'd probably fall in love with them instantly:


This one would be ok too:


To see more, check out Cake Wrecks.


As for other cool internetty things, one of my favourite all-time crafters, Debbie Stoller has posted some really cool and well-done knitting videos. The first one teaches the absolute beginner how to cast on and start knitting, and the other two talk about lace, one explaining the yarnover and the other how to do decreases.

If you want to get a detailed review, I wrote one over on the Happy Seamstress, and in the meantime, here's a screenshot to whet your appetite (I love that orange background!):

Friday, July 15, 2011

Prize-Winning Lemon Poppy-Seed Muffins

Every now and then I go through my picture folders and I find something I really should have blogged about ages ago. This morning, I found some photographs of some very tasty muffins I made way back in March for the department muffin competition. There were a lot of very delicious entries, including some fantastic zucchini muffins and even some bacon muffins. I opted for a sweeter flavour and went with a (then) recently-discovered recipe from Bittersweet: her Lemon Poppy-Seed Muffins.


I followed the recipe almost exactly, except I substituted non-vegan yogurt for the vegan kind because I couldn't find any in my supermarket. That's ok, I wouldn't even come close to calling myself a vegan. Anyway, I ended up winning! The muffins had a beautiful zesty flavour, and when I tasted the batter before baking, I could almost feel it sparkling on my tongue.


My favourite part was the sugary poppy-seed topping. It was sort of like icing on a cupcake (but healthier of course because it's a muffin). I think next time I might try it with orange flavouring instead of lemon... that'd be nice.

Monday, June 13, 2011

The Perfect Baileys Oatmeal Cookies


Photo courtesy The Happy Seamstress


This recipe is courtesy of the boyfriend, who is an awesome cook. This all started when we had a craving for cookies, but didn't have any eggs. We looked up some egg replacements on the Interwebs, but it seemed as though you could replace eggs with pretty much any liquid. I think we briefly considered milk as an option, but then the boyfriend came up with the much better idea of using Baileys instead. The result is nothing short of incredible.

The real key to making these cookies taste amazing is to cook them just long enough so that they're barely firm on the outside and incredibly chewy on the inside. To quote the boyfriend: "Don't fuck with the timing, 11 minutes is perfect and I will fight anyone who says otherwise. If you want a crispy cookie, find another recipe, this one is wasted on you."

So, without further ado, here's the recipe!

Perfect Baileys Oatmeal Cookies


1 1/4 C Brown sugar
3/4 C Butter
1 tsp Vanilla Extract
2 tbsp Baileys
1 C Flour
2 C Oatmeal
1 tsp Baking soda
1/2 tsp salt
1/2-3/4C Optional additives

Preheat oven to 350. Mix sugar & butter, add vanilla & Baileys and mix until well combined. Mix dry ingredients together and add to wet; combine to cookie dough consistancy. If too dry, add more Baileys of course! Spoon onto baking sheet, and cook for exactly 11 minutes for perfect chewy consistency. You can customize the recipe by adding desired amount of chocolate chips, dried cranberries or apricots (chopped), pistachios, almonds, soylent green, or walnuts.

EDIT - Here are some factual errors and important notes the boyfriend felt the need to point out:

1) Not any liquid works as an egg replacement. We gave up looking for egg replacements because vegans make the worst websites. Inspired, I developed an extreme sense of adventure leading to an alcohol related experiment.
2) Milk was not an option because it had chosen to transform itself into an intriguing form of blue cheese
3) The cookies are only firm on the outside after they cool down. You want to cook them until they are lightly golden brown 3mm from the edge.
4) Soylent green is an acquired taste that once acquired, works with everything. If you prefer, you can use vegetarian soylent green made from algae.
5) I'm serious about the timing. Don't fuck with it. Unless your oven temperature can't be controlled with accuracy. Then watch for 3), or experiment further. Don't be afraid to experiment, even the batch I burned was delicious.
6) Using the cookies as ice cream sandwiches is pretty much the nicest thing you can do for yourself or your loved ones. Details & pictures in a later blog post.
7) If you use artificial vanilla extract, margarine, or white sugar when you make this, don't tell people it was my recipe. Spend a few extra dollars, it is worth every penny.

Saturday, March 19, 2011

Happy Belated Pi Day!

Every year (or at least, every year since I moved to Toronto) I celebrate Pi Day, the semi-official holiday commemorating the mathematical constant pi, on March 14th (3/14, get it?). According to the Wikipedia page, it was invented by Larry Shaw in 1988 and was first celebrated at the San Francisco Exploratorium. There are many ways to celebrate, including contests to see who can recite the most digits of pi, or pi day jeopardy, but we generally just eat a lot of pie and drink a lot of mathematically-themed cocktails.

My friend Greg brought a pi cake, which wasn't a pie, but since it was a mint chocolate chip ice cream cake, and he totally confused the guy at Baskin-Robbins by asking him to put the greek letter pi on the cake, we forgave him.


We made pi day cocktails with pi cubes.


Almost everyone brought a pie, and they all happened to be different flavours! Win!


All photos courtesy the Happy Seamstress.

Thursday, October 29, 2009

The Mighty Turducken

This Thankgiving (yes, I'm two weeks late... shaddup), the boyfriend and a friend of ours decided to cook a turducken, that is, a chicken stuffed inside a duck stuffed inside a turkey, all of which have been de-boned and stuffed. Apparently, it took an experienced butcher two hours to prepare, so we weren't about to make our own from scratch. The cooking and eating were supposed to happen at the friend's house, but he came down with strep throat, so it ended up being at our place. We picked up the bird combo from his place at midnight after an evening of drunken debauchery, and started cooking the sucker as soon as we got home.


Weighing in at a mighty 25.8 lbs (recall: no bones, therefore, all meat!), this was one big bird. After rubbing it with some creole spices, the boyfriend shoved and squeezed it into the oven where it would begin its 13-hour baking adventure. I went to bed (around 2:30 am) with the smell of turducken wafting through the air, and I woke up to the same smell. Kind of awesome.


By late afternoon the next day, the beast was ready to be eaten and eaten it was. The drumsticks came off the body like butter, and the whole thing was tender and juicy and delicious. One of the stuffings was bacon-herb, so we were in fact eating four animals at once!


Here is the ruined beast... even after feeding a dozen people and giving pieces of it to our guests, we still had a quarter of the birds leftover.


It just barely fit in our largest mixing bowl, and lasted us many meals. This is something that we won't do for a while (turns out turduckens are expensive), but it was definitely worth the experience!

Monday, September 21, 2009

Pie Pops!

Ok, so I'm cheating a little bit. I had told myself that I wouldn't blog about anything until my final report and defense for my summer project were finished, but I have such a backlog of things to blog about, that I figured it wouldn't be too bad to write a little entry now.

Anyway, two weeks ago now (yup... backlog) was a friend's housewarming party. It wasn't a potluck, but I thought I'd take the opportunity to make pie pops, the recipe for which I found on Instructables, possibly one of the coolest places on the interwebs.

I used elderberries for the filling, mostly because that's what the boyfriend brought back from the farmers market when I asked him to pick me up some fruit good for pies. They weren't particularly amazing... kind of bitter, but they worked ok when soaked in sugar. I'll probably use peaches next time (as the recipe recommends), which will be on Pi Day! So, here they are:


Needless to say, they were a great success. Even my friend's roommate's mom like them, and she's a professional pie taster! My friend certainly enjoyed them...


Nom nom nom!

With the leftover elderberries, I made a normal pie, which didn't turn out amazingly either, mostly because the ratio of elderberries to crust was larger, but it was edible. And it sure looked perdy.


Friday, August 21, 2009

I'm a superstar!

It looks like my new Star Trek pot holders are a success! In less than 24 hours since I posted the pattern on Ravelry, it's already been favourited 99 times, is in 48 queues and has 5 comments. That's more than my previous two patterns, the ostie de cozy and the rose choker ever got combined since April and January respectively. I guess this is my five minutes (or few hours) of internet fame... Anyway, I guess there are a whole lot of Trekkie knitters out there!

In other news, I want a swift. This is a tool used to wind hanks of yarn into balls of yarn by stretching it out over a rotating frame, that moves around as the ball is wound. It's usually adjustable in size, which allows it to accommodate many different sizes of yarn. I just spent a couple of hours winding 100g a hank of sock yarn into a ball by hand, a process slowed down by the fact that I had to rotate by hand the yarn which was wrapped around the back of a chair and my left foot. Anyway, it looks something like this:


Unfortunately, most are around $65 in price, which is a little much, especially when I use hanks so rarely (though I just got a shipment of sweater yarn from Webs, and they're all in hanks). I found an Instructables tutorial on how to make one, but given the fact that I live in a small apartment and don't have a garage filled with random pieces of lumber or the proper tools for woodworking, I have a feeling that that's not a viable option. I suppose I can always just go down to the Purple Purl and see if they'd let me use theirs... or maybe there's a yarn shop closer that would let me use theirs if they have one. I don't care too much about a ball winder (though they're much cheaper) since I've gotten pretty fast at winding balls by hand, and I don't mind if my balls don't look like those neat little cakes that ball winders make, but a swift sure would be handy.

Update: I've found this on ebay, and I still have 29 days to decide, so maybe I'll go for it. It seems like an entirely decent price, compared to some of the other ones.

Update #2: My friend Stevie has agreed to make me a swift using that tutorial! Hurray! Also, I found a recipe for Pie Pops! How could this day get any better?

Monday, July 6, 2009

Fastest crocheter and pie on a stick

In the same vein as last post, where I discovered the world's fastest knitter, I decided to look up the world's fastest crocheter! Apparently, the Guinness World Record holder for fastest crocheter, at 5,113 stitches in 30 minutes (that's about 3 stitches per second!), is Lisa Gentry, born in Germany, and now living in Louisiana. She is also a successful (I think) crochet designer. Here is Lisa Gentry's crochet speed challenge where she does 24 treble crochets in a minute:


For the second part of my post, I want to talk about pie. I love pie, in all its forms... double-crust, single-crust, meringue-topped... There aren't many pies I'll say no to. I'm even into savory pies, like meat pies and quiche. I was reading Bittersweet this morning and Hannah was presenting a recipe for veaganized Grasshopper Pie. It looks delicious of course, but later in her post, she freezes the pie pieces, puts them on a stick, dips them in chocolate and calls them pie- sicles! What a genius idea! Why hasn't anyone else thought of this? I would buy them by the dozen... however, with Hannah's recipe, I guess I can make them by the dozen... yum yum. Here's her picture:

Thursday, April 16, 2009

Yum yum ice cream sandwiches

This photo has been kicking around Photobucket for a couple of weeks, so I figured, since everyone loves food porn, that I'd post it.


Those are ginger and vanilla ice cream sandwiches. My man made them with these cheapo ginger cookies we bought at the convenience store and the leftover vanilla ice cream from Pi Day. They have to be left in the freezer overnight so that the cookies absorb some of the moisture from the ice cream and soften up, and then they're delish-tastic!

Monday, March 16, 2009

Leftovers

I always find that using up leftover balls of yarn is strangely cathartic. I recently had the opportunity to finish off a couple of skeins, one from my sweater and the other from the hat and scarf, both mentioned in the previous post. The first project was made from the leftovers from my Cherie Amour sweater. I wanted to make a Queen Anne's lace scarf, but it turns out I barely had enough yarn to make the "scarf" go around my neck once. No problem! I found a funky button, and I made a neck warmer.


I think I actually like this better than a scarf. It's not bulky but it still keeps my neck warm, and it looks super cute peaking out from under my jacket. The second stash buster was the Simple Crochet Headband, which I modified by adding one of those roses I like so much. This was done with that pretty yarn from the scarf and hat I made for my friend...


Speaking of leftovers, Saturday was Pi Day, and my astronomy friends and I celebrated in style with many, many pies.


I made my first successful double crusted pie (unlike last time). I think the trick was using white flour instead of whole wheat... the crust was fantastic. It's a blueberry pear pie because I ran out of blueberries and had a can of pears lying around. Turns out that it's better that way because the pears add a nice texture to it.


I had some crust dough left over (as well as some pears) and so I made a pear turnover. I think this one got devoured almost immediately, therefore, success!


At the moment, I still have three unfinished pies in the fridge, as well as a tubfull of apple crumble. Needless to say, I'm in heaven...

Sunday, February 22, 2009

Breadmaker bread and naan bread

When my grandmother moved out of her house and into a retirement home, I inherited all sorts of useful things from her house, among them a breadmaker. For the last five months or so, I've been too lazy to even crack the recipe book open. However, yesterday, in a fit of productivity, I finally got around to making my first loaf. I followed the instructions with extra-special care, and started the machine up. Two and a half hours later, I looked through the little glass window at the top of the machine, and this is what I saw:


Oh no! The bread was trying to escape! I must have put too much flour. I had thought that my measurements had been meticulous, but then my boyfriend informed me that our measuring cup is slightly larger than a standard cup. I'll have to remember that for next time. Despite the largeness of the loaf and its funny top, it came out well, and tastes delicious.


While the bread maker was doing its thing, I thought I should get doubly productive and make some naan bread as well. I found this recipe online, and since it got such a high rating (who can argue with "This recipe makes the best naan I have tasted outside of an Indian restaurant."), I decided to give it a try. The only change I made to the recipe was to use olive oil instead of butter.


They turned out super well, just like the naan I've had in indian restaurants. The recipe really makes a lot too. I was left with over 20 naan breads, which should last me a little while. For anyone who wants to repeat this recipe, a few words of advice. I used a non-stick frying pan instead of a grill, and I found that it was easier to brush oil onto the rolled-out dough before putting it onto the pan and then buttering the other side once it started to puff up. Also, the thinner the dough, the more bubbles appeared. Finally, if using a frying pan, like I did, the heat should go no higher than medium or the naan will get burnt.

Saturday, February 21, 2009

A failed pie

My boyfriend's favourite pie is cherry. While waiting for an optometrist's appointment one day, I picked up a can of cherry pie filling at the local convenience store. Because I can't stand store bought pie crusts for some reason, I made my own. Making a one-crust pie is simple. If you mess up the bottom crust, you can always moosh it around in the pie pan to cover up any rips, and if it looks kind of wonky, no one's going to see it anyway. Two-crust pies are a different matter.

It only seemed appropriate that this pie should be a two-cruster, since the recipe I have makes enough for two crusts, and I only had enough filling for one pie... And a cherry pie wouldn't work very well as an open-crust pie anyway. Everything was fine for the bottom crust, but when I tried to put the top crust on, it tore in a couple of places, and try as I might, I just couldn't pinch the rips back together without more filling spewing out on top of the crust. I might not have put enough margarine (or maybe I should have used butter), and maybe whole wheat flour wasn't the best idea ever. Anyway, the poor pie ended up looking like this:


Here's a close-up of that ugly tear:


It still tasted pretty good though, even if it wasn't the prettiest thing to look at.