Crochet, knitting, astronomy & life in general.

Showing posts with label Free pattern. Show all posts

Wednesday, January 2, 2013

The Annual Christmas Knitting Post (Part I)

Happy New Year to all! Despite my blog silence, I've been extremely busy on the craft front. This year, I only decided to knit for one person, my dear old dad, for Christmas. And then, at the last minute, I realized I hadn't gotten anything for my friend Ed, nor my friends' new baby or his older sister. Whoops! And so the madness began, a mere two weeks before Christmas.

The one hand-crafted gift I had planned in advance was a pair of guitar socks for Dad. The reason was that the pair I had knit him a couple of years ago, through bad planning, had shrunk a bit and were unwearable. They had always been tight because of the method of construction (the top part is knit flat and sewn together, and the yarn choice was not optimal for socks (Knit Picks Palette), since it felts easily.

So this year, I actually got the right foot measurements (instead of just his shoe size), I went with a pattern I know will work (toe-up), and I bought a yarn that I know is machine-washable (at least according to Ravelry). The result, if I do say so myself, was perfect...


The yarn is Spud & Chloë Fine in the Green Bean colourway, which is a wool-silk blend that feels absolutely lovely both during the knitting and knit up. Instead of my regular short-row toe, I went with the toe-up cast on featured here, casting on 12 stitches on each needle, I believe, and increased two stitches on each side every other row until I had a total of 72. I then did a short-row heel with 12 wraps on each side and finished off with a 2x2 ribbing and Jeny's surprisingly stretchy bind-off.

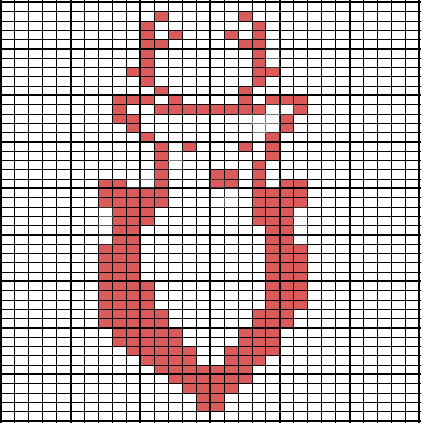
The guitars were added using duplicate stitch using some left-over Knit Picks Palette. I discovered that I actually really enjoy duplicate stitch. It doesn't always look as perfect as when you do colourwork in the pattern, but it's always much stretchier, and I had learned my lesson from the last pair of socks. Here's the chart I made up, in case someone else ever wants to use it:


He seemed pretty pleased with them! (What a goof!)


Speaking of gifts for my Dad, I also whipped him up a hat, which I called a late birthday present. The last hat I made him, way back when I had my first crafty Christmas, was (again) a bit too small. So I picked up some Patons Decor at the local yarn store (Lennoxville has a LYS! Rejoice with me!) and whipped up a suitably manly hat. I used Claire Nordlow's 2x2 Rib Hat pattern, which is quite excellent, and did the ribbing for the whole 10 inches so that he could roll up the brim. I just love that simple little triangle on top!


Dad was quite happy with this one too. It's super cozy.


I think that's enough for the moment. Be prepared for some sillier gifts in Part II!

Saturday, December 3, 2011

Wine bottle cozy pattern


It's been a little while since I've posted a free pattern, so here's something quick and easy for you. I whipped up these crocheted wine bottle cozies a few hours before some friends' wedding party to cover up a bottle of port and a bottle of homemade white wine which we were bringing as gifts. This is the label for the home-made wine, by the way:


The label says "Sam's Beard Estates WINE BITCHES!" Yeah... not totally family-appropriate, but we had a hoot making them. The reddish shape is the silhouette of the boyfriend's beard as seen from the side. If you stare at it, you might get it, but it's meant to be a little abstract.

Anyway, on to that pattern! I used two thirds of a leftover ball of Knit Picks Telemark for the purplish one, and then some mystery worsted weight for the white one. The grey yarn is Bernat Berella 4 Solids & Ragg, which is a worsted weight yarn, but I think you can probably use anything from sport weight to worsted for this pattern, since the double crochet is fairly stretchy.

Materials:
  • About 50 grams of a sport to worsted weight yarn
  • a 5mm crochet hook
  • a darning needle to sew in the ends

Gauge: Approximately 3 sts per inch, but it doesn't matter too much

Instructions:

Make magic ring (you can find a good tutorial here). Ch 3 (counts as 1st dc).

Rnd 1: Dc 11 sts into ring, sl st into 3rd chain. Pull ring tight. (12 sts)
Rnd 2: Ch 3, dc into sl st, * 2 dc in next st, rep from *, sl st into 3rd chain. (24 sts)
Rnd 3: Ch 3, dc into sl st, * 1 dc in next st, 2 dc in next st, rep from *, sl st into 3rd chain. (36 sts)
Rnd 4-10ish: Ch 3, dc around, sl st into 3rd chain. (until it extends to the beginning of the neck of the wine bottle)
Rnd 11: Ch 3, * dec 2 sts, 1 dc in next st, rep from *, sl st into 3rd chain. (24 sts)
Rnd 12: Ch 3, dc around, sl st into 3rd chain.
Rnd 13: Ch 4, * sk 1 st, 1 dc in next st, ch 1, rep from *, sl st into 3rd chain. This creates eyelets to pass the drawstring through.
Rnd 14: Ch 3, * dc into ch, dc into next dc, rep from *, sl st into 3rd chain.

Fasten off.

With a 12” piece of yarn, twist and fold in half so it twists up on itself, and tie knots at each end. Then draw through the eyelets. You can also use a crochet chain or an i-cord if you want.

You can do this in red, green, and white stripes for a very festive wine cozy, and it adds a nice personal touch to that bottle of wine you bring to a Christmas party. Enjoy!

Edit (April 24, 2012) - Changed row 3 from 32 sts to 36 sts.

Saturday, August 13, 2011

Double-knit Potholders: Now Officially a Wedding Tradition

I recently returned from the Eastern Townships where some very awesome friends of mine got hitched. They did the deed in the most beautiful place on Earth, Baldwin Mills (I took some pictures last summer). I'm not joking. This is what I woke up to the day after the wedding:


The ceremony was beautiful (partly because I was asked to play violin at the last minute), the dinner was delicious (there was a whole roast lamb), the booze was plentiful (there was a bathtub of beer), and the party was incredibly fun. Those Baldwins sure do know how to get married. Anyway, as has become a tradition for me (see here, here, and here), I made the couple some double-knit potholders as a wedding present.


As usual, I tried to make the designs representative of the couple. The pixelated deer on the left is from the groom's now very successful game Sword & Sworcery. The mounted deer head on the right has become the couple's personal logo. They even used it on the wine bottles at the wedding.


If you feel like knitting Sword & Sworcery deer or Dead Deer potholders of your own, here are the charts for both designs (click for larger size):


Speaking of double-knitting, I've written a tutorial for making your own double-knit fabric over on the Happy Seamstress. You should check it out!

Thursday, September 23, 2010

Buffy/Zero Punctuation Pot Holders

One of my primary reasons for visiting the Townships last month was to attend a good friend's wedding party. They got married in early July, but didn't have the reception until later for logistical reasons. At any rate, it was incredibly fun, and I got to see a lot of people I hadn't seen in ages.

As has apparently become a tradition for me, I made them double-knit pot holders. She is a big Buffy the Vampire Slayer fan and he's really into video games, so for one pot holder, I used the chart from this scarf pattern to make a Buffy B, and for the other, I decided to make my own chart for the demon from Zero Punctuation, a hilarious video game review site that I know he enjoys. Both turned out as well as I could have hoped for.


I have never seen any Zero Punctuation knitting patterns on the interwebs, and so, here is my ground-breaking foray into this neglected area of geeky crafting. If you want to make your own double-knit ZP pot holders, follow the basic instructions for my Star Trek Pot holders, but instead of using the Star Trek chart, use this one:


You'll also have to cast on 29 stitches instead of 30, and knit for 44 rows instead of 46. Enjoy!

Thursday, August 20, 2009

Star Trek Pot Holders Free Pattern


I created these for my friends who were getting married. I knew they were Star Trek fans, and pot holders are a useful kind of thing for a newly wed couple, so this seemed perfect. Unfortunately, I couldn't find an appropriate chart, so I made my own! I believe this is the Next Generation logo, but I could be wrong, since I'm not much of a Trekkie myself.

This is my first experiment with double-knitting, so if my instructions seem unclear, this is a pretty decent tutorial, and I'm sure you could find all sorts of instructional videos on YouTube. Basically, double-knitting creates two pieces of fabric at a time with their wrong sides together. If there were no colour work in this pattern, you'd be able to separate the two pieces of fabric to make a bag. In fact, Kory Stamper, in this article for Knitty's Fall 2006 issue, suggests using the double knitting technique to knit two socks at the same time inside each other (that just sounds dirty). It's an amazing technique that you should probably check out (I know it's on my to-try list).

Anyway, without further ado, here's the pattern!

Materials
- 2 balls of worsted weight cotton yarn in contrasting colours. I used 1 ball of Lily's Sugar 'n Cream (109m/71g) in Ecru and 1 ball in Bright Navy.
- 4.0mm (US 6) straight needles
- 5.0mm (H) crochet hook
- tapestry needle

Gauge
15 st and 22 rows per 4"
Gauge is not very important for this pattern, but with my gauge, I ended up with approximately 8" square pot holders. Note also that your gauge will tend to be looser when double knitting than indicated on the ball band with the recommended needle size.

Abbreviations
k - knit
p - purl
ch - chain
sc - single crochet
sl st - slip stitch
st - stitch

Instructions

1. Cast on 30 sts using both colours of yarn held together. This will give you 60 sts in total. Make sure that the colours stay in the same order as you're casting on (in my case, it looked like one ecru stitch follow by one navy stitch, one ecru, one navy, and so on).

2. Follow the chart, working right to left on the odd rows and left to right on the even rows. To double-knit, you k one colour (this will be the colour that shows on that side) and then p the next (it will show up on the other side as a k st), each time bringing both strands of yarn between the needles. When changing colour, simply k the contrasting coloured yarn on the front side and p the other colour of yarn, being careful not to twist the strands together.


3. After you've finished knitting up the whole chart (46 rows), you should have the image on one side and an inverse-colour mirror image on the other side. Bind off loosely in pattern by passing two strands of contrasting colour over the next two strands of contrasting colour. That is, you'll k one colour and p the next, and then pass the previous two k and p sts over the ones you just knit.

4. Weave in the ends.

5. With crochet hook and one of the yarn colours, make a sc border around the pot holder, making one st every two rows for the sides, one st for every st on the top and bottom, and increasing by one at the corners. Alternately, you can crochet a patterned border like those found here. I didn't try it myself, but I think it might be kind of funny to have extra-frilly Star Trek pot holders.

6. Ch 10 and turn, sl st in 1st sc. This will create the loop for hanging up the pot holders. Cut yarn and weave in ends.

Repeat for the second pot holder, only use the other colour of yarn for the sc border.

And voila! Pot holders for the extra-nerdy Suzy Home-maker in your life!

Wednesday, June 3, 2009

Crocheted Rose Choker (Free Pattern)

This pattern is also on the CrochetMe site, but I figured I'd repost it here.


Introduction

This is a pattern for a rose choker. It was meant as a surprise present for a friend using leftover yarn from a project she asked me to do. The rose pattern was taken from the "Brier Rose" pattern by Jennifer Fletcher from Anticraft: Knitting, Beading and Stitching for the Slightly Sinister by Renée Rigdon and Zabet Stewart, and the leaf pattern is the "Basic Small Leaf" from Nicky Epstein's Crocheted Flowers. The body of the choker is of my own design.

Materials List

* A small amount of baby weight cotton yarn in red and green (the smoother the better)
* 3.5mm crochet hook
* A pretty button (about 3/4" in diameter) in a complementary colour (I used a red button).

Finished Size

The choker band is a little less than an inch (2.5cm) wide, and it should be long enough to fit snugly around your neck. The rose and leaves can be any size you want.

Gauge

I got approximately 14 sts per 2" (5cm), but since the number of stitches you begin with is dependent on the circumference of your neck, it's better just to go with that and not worry too much about gauge.

The Pattern

choker (green):
make a chain ribbon the length of the circumference of your neck with an even number of ch.
row 1: sc in 2nd ch from hook, sc in each ch to end, ch 3, turn.
row 2: *skip 1st st, dc in 2nd st, dc in 1st st, making an X, rep from * to end, ch 1, turn.
row 3: sc in each sc across, 2sc in ch 3 from row 2, ch 8, 2 sc in ch 3, fasten off.

leaf (green, make two):
ch 8
row 1: sl st in 2nd ch from hook, in each ch, 1 sc, 1 hdc, 1 dc, 1 hdc, 1 sc, 3 sc in last ch, working around other side of chain in each ch, 1 sc, 1 hdc, 1 dc, 1 hdc, 1 sc, 1 sl st, join with sl st in first sl st.
row 2: working blo, sl st in each st to 3 sc group, sl st in first sc, ch 2, skip next sc, sl st in 3rd sc, sl st in each st to end. Join with sl st in first sl st. Ch 4 for stem.
Fasten off.

flower (red):
make adjustable ring
rnd 1: 5sc into adj ring, join, ch1 [5]
rnd 2: sc in each st around, join, ch1 [5]
rnd 3: 2 sc in each st around, join, ch1 [10]
inside petals:
rnd 4: working flo, *(sc, ch1, dc, ch1, sc) in next st, sl st in next st, rep from * around (5 petals)
rnd 5: working blo, *sc in next st, 2 sc in next st, rep from * around, join, ch1 [15]
middle and outside petals:
rnd 6: working flo, *(sc, hdc, dc) in next st, (dc, hdc, sc) in next st, sl st in next st, rep from * around, ch 1 (5 petals)
rnd 7: working blo, *(hdc, dc, tr) in next st, (tr, dc, hdc) in next st, sl st in next st, rep from * around. (5 petals)
Fasten off.

Sew in ends, sew leaves and rose to center of choker, and sew the button to the end of the choker, opposite the button loop.


Sunday, April 5, 2009

Un Ostie de bon Cozy! Free pattern

Because my man person was pining for la belle province, I made him a quebecois beer cozy. He said it was perfect. So for all you canadiens out there, here's the ostie de bon cozy!


Materials:
Patons Astra in Electric Blue and White
4mm crochet hook
tapestry needle

Abbreviations:
ch - chain
sl st - slip stitch
sc - single crochet
hdc - half double crochet
dc - double crochet
tc - treble crochet
blo - back loop only
st - stitch
inc - in next chain
in#c - in next # chains

Instructions:

Cozy body:

With blue yarn, make an adjustable loop.
Rnd 1: 6 sc in ring
Rnd 2: 2 sc in each st around (12 sts)
Rnd 3: *2 sc in next st, sc in next st; rep from * around (18 sts)
Rnd 4: *2 sc in next st, sc in next 2 sts; rep from * around (24 sts)
Rnd 5: *2 sc in next st, sc in next 3 sts; rep from * around (30 sts)
Rnd 6: Working in blo, sc in each st around, change to white yarn without cutting blue yarn
Rnd 7-8: Sc in each st around, change back to blue yarn and cut white yarn
Rnd 9-23: Sc in each st around, change to white again without cutting blue yarn
Rnd 24-25: Sc in each st around, cut yarn and change back to blue
Rnd 26: Sc in each st around, cut blue yarn.

Fleur-de-lis applique:

With white yarn, ch 6, sc in 2nd ch from hook.
1st petal: Ch 7, sl st in 2nd ch from hook. Sc & hdc inc. Dc inc. 2 dc inc. Hdc & sc inc. Sl st inc. Sc inc of original chain.

2nd petal: Ch 9, sl st in 2nd ch from hook, sc inc, hdc inc, dc inc, tc inc, dc inc, sc inc, sl st inc. Sc inc of original chain.

3rd petal: Same as first petal, but twist right before the sc inc of original chain. Sc inc.

Bottom: Ch1, sl st in2c of the bottom of the chain, [sc, ch, dc, ch, sc] inc, sl st in2c. Cut yarn.

Finishing:

Sew the fleur-de-lis applique to the cozy body, making sure that it's between the two white lines. Sew in ends.